Introduction
A slight change in tack for this post. I've been getting more involved in continuous integration and testing recently (which I've decided is a good thing) and two of the tools we've been using are TeamCity (which I've also decided is a good thing) and FitNesse, more specifically dbFit (which I'm still undecided on). The relative pros and cons of each are, thankfully, out with the scope of this post.
What I will be showing is how you can run a FitNesse test suite from a TeamCity build configuration, with the individual test results available in the Tests tab of the build and the FitNesse test report in HTML as a build artifact. I'd like to show more screenshots than I'm about to but our TeamCity installation contains a fair amount of client names, and I can't be bothered to blur them all out in Fireworks. Also there's more red than there should be on the Overview page.
Assumptions and Pre-requisites
- You've been working with both TeamCity and FitNesse or at least know how they work.
- You have an existing TeamCity installation with a project and a build configuration that you can modify.
- You have an existing FitNesse installation that's callable from your TeamCity server.
- You have the TestRunner.exe for FitNesse, found in the dotnet folder, provided you have it.
- You're using TeamCity 6.5.6 or can figure out the equivalent steps for your version.
Instructions
First up, download the junit.xslt file and place it in your FitNesse dotnet folder.
Open up your TeamCity home page. Click on the relevant project, click the Edit Project Settings link and then select the Parameters tab. We're going to add some environment variables specific to the FitNesse environment. Add four Environment Variables with the following names and values.
| Name | Value |
|---|---|
| env.fitnesse.lib | The path to the directory containing the TestRunner.exe. e.g. C:\Fitnesse\lib\dotnet2 |
| env.fitnesse.port | The port number that your FitNesse server is on. e.g. 8085 |
| env.fitnesse.server | The name of your FitNesse server. e.g. fitvm01 |
| env.fitnesse.suite | The full name of the test suite you want to execute. e.g. FitNesse.StuartWhiteford.TestSuite |
Now, select the General tab and then click the Edit link next to your chosen build configuration. On the General Settings page add the following line to the Artifacts path field.
%system.teamcity.build.checkoutDir%\\dbfit.results.html

%system.teamcity.build.checkoutDir%\\dbfit.results.html
Our build step will ensure that the FitNesse results are saved as dbfit.results.html to the checkout directory.
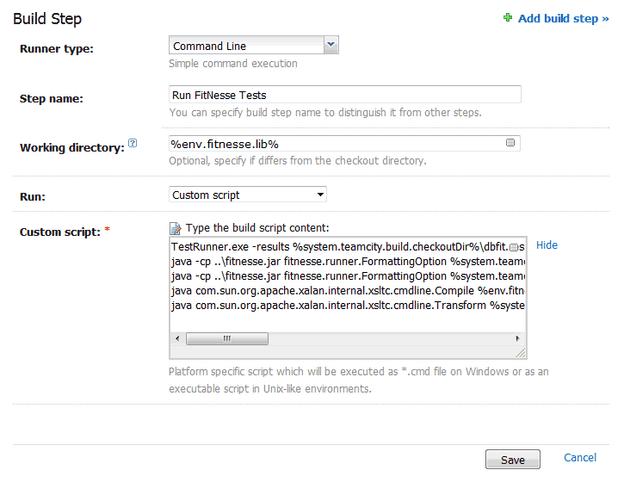
Next, click on the Build Step(s) menu item for the build configuration and click the Add build step link. In the New build step page select Command Line as the runner type and enter a sensible name for the step (Run FitNesse Tests). In the working directory enter
%env.fitnesse.lib%

%env.fitnesse.lib%
, select Custom script in the Run field and finally enter the following lines in the Custom script field.
TestRunner.exe -results %system.teamcity.build.checkoutDir%\\dbfit.results %env.fitnesse.server% %env.fitnesse.port% %env.fitnesse.suite%
java -cp ..\\fitnesse.jar fitnesse.runner.FormattingOption %system.teamcity.build.checkoutDir%\\dbfit.results xml %system.teamcity.build.checkoutDir%\\dbfit.results.xml %env.fitnesse.server% %env.fitnesse.port% %env.fitnesse.suite%
java -cp ..\\fitnesse.jar fitnesse.runner.FormattingOption %system.teamcity.build.checkoutDir%\\dbfit.results html %system.teamcity.build.checkoutDir%\\dbfit.results.html %env.fitnesse.server% %env.fitnesse.port% %env.fitnesse.suite%
java com.sun.org.apache.xalan.internal.xsltc.cmdline.Compile %env.fitnesse.lib%\\junit.xslt
java com.sun.org.apache.xalan.internal.xsltc.cmdline.Transform %system.teamcity.build.checkoutDir%\\dbfit.results.xml junit > %system.teamcity.build.checkoutDir%\\dbfit.results.junit.xml
Line by line, this script will perform the following actions:
- Call the TestRunner executable outputting the results to a file called dbfit.results in the checkout directory, passing in the FitNesse server, port and test suite to run. This is the command that actually runs the tests.
- Format the dbfit.results output as XML. This will allow us to see the status of each of the tests in the build.
- Format the dbfit.results output as HTML. This will become the FitNesse test report artifact for the build.
- Compile an XSLT file that we will use to transform the FitNesse XML to JUnit XML (a format that TeamCity understands).
- Perform the transform, saving the results as dbfit.results.junit.xml in the checkout folder.
Your build step page should look something like the following.
Click the Save button to save the new build step. Back on the build steps page click the Add build feature link. In the dialogue select XML report processing as the feature type and Ant JUnit as the report type. In the Monitoring rules fields enter
%system.teamcity.build.checkoutDir%\\dbfit.results.junit.xml

%system.teamcity.build.checkoutDir%\\dbfit.results.junit.xml
and lastly check the Verbose output field. Click the Save button.
If your build is that's one that can be run manually go ahead and run it, then watch the progress on the Overview page.
Once the build has completed, click on the Tests passed (hopefully) link and then on the Tests tab to view the status of the individual tests within the FitNesse suite.
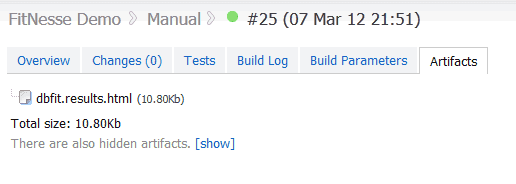
To view the FitNesse test ouput page, click on the Artifacts tab. You should then see a link to dbfit.results.html. You can also get to here from the Artifacts context menu in the Overview page.
That's all there is to it. Note that you're not limited to a single build step and test suite with this method. You could run a single test with one build step; have multiple build steps running a single test or an entire suite.
Conclusion
I'm still unconvinced with FitNesse and dbFit as a testing framework, perhaps because I've also spent much time recently with WatiN and Selenium, but at least now it's part of our big happy CI family. Just.


