Introduction
This is the first in a (possible) series of posts about the Dynamic Data feature in ASP.NET 3.5. The purpose of Dynamic Data is to make it easy to quickly develop a data-driven web application. The purpose of this post specifically, is to demonstrate how to take what you get at the end of the wizard and turn it into a slightly more polished web application. This post will not go into detail regarding the concepts involved in Dynamic Data (LINQ, ASP.NET Routing, etc.), see the further resources section at the end for links to these topics.
What you need
- Visual Studio 2008
- ASP.NET 3.5 Service Pack 1 Beta or Visual Studio 2008 Service Pack 1 Beta
- Dynamic Data Runtime and Templates
Once you've got Visual Studio 2008 up and running, install the ASP.NET 3.5 Service Pack or the Visual Studio 2008 Service Pack, then run the Install.cmd file from the Dynamic Data Runtime and Templates zip file.
Building the website
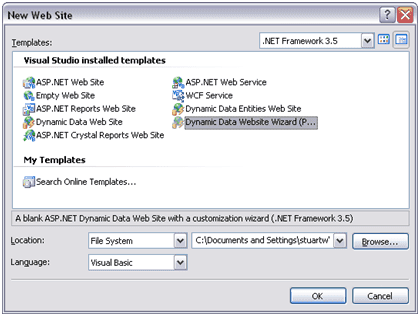
- Open Visual Studio 2008 and create a New Web Site….
- Select Dynamic Data Website Wizard (Preview) from the templates, change the name if required and press OK.
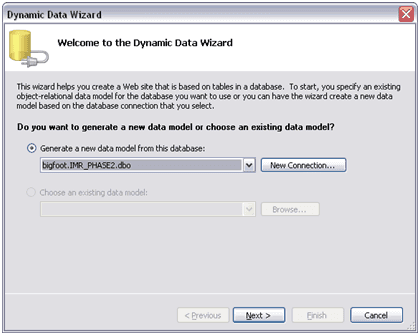
- If you've got an existing data model and want to use it select it from the drop down list, otherwise click New Connection….
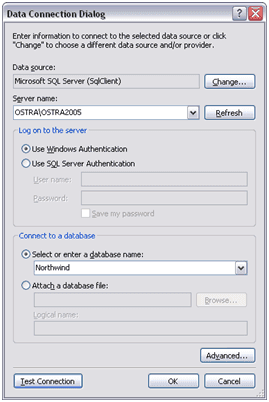
- Select your server and database and click OK.
- Click Next > when you return to the main dialogue box.
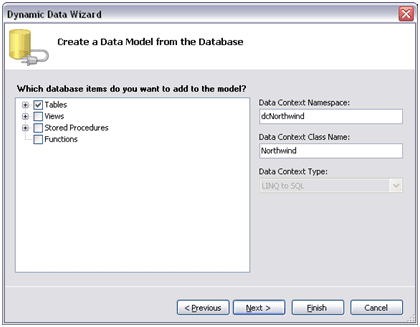
- Leave the Data Context Namespace blank as this can lead to problems later.
- Change the Data Context Class Name if required.
- In the tree view, select the items that you want the wizard to model. For the purposes of this demo, we'll only select the Tables.
- Click Next >.
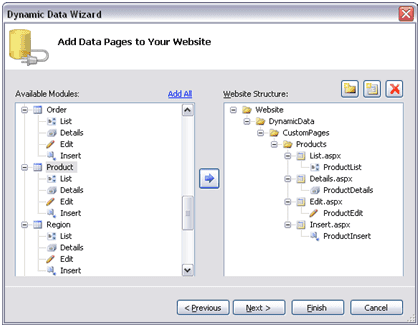
- The next screen asks you to add Data Pages to your website. Note that you don't actually have to add any pages here, what this screen should really be asking is what pages do you want to be able to customise in the finished website. In the screenshot below, we have chosen the Product table.
- Click Next >.
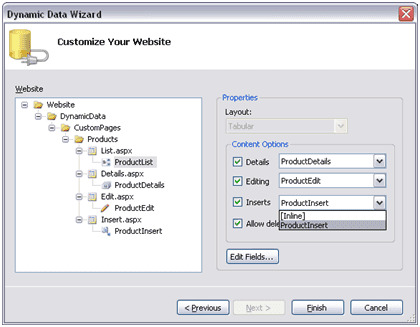
- The following screen displays the pages that we have selected to customise in the left hand tree view; on the right hand side you can set the properties. Currently the only layout option is tabular, although more are promised in future releases. The content options provide a way of changing the way data is input on the Insert and Edit screens. Your options here are a separate page (which has an editable DetailsView) or Inline in the GridView. You can also choose whether records can be deleted and edit the list of fields that are displayed to the user.
- Click Finish.
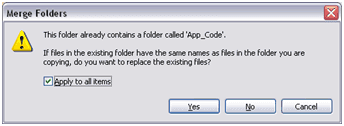
- You'll now get a warning about overwriting items in the App_Code folder. Check the Apply to all items box and click Yes.
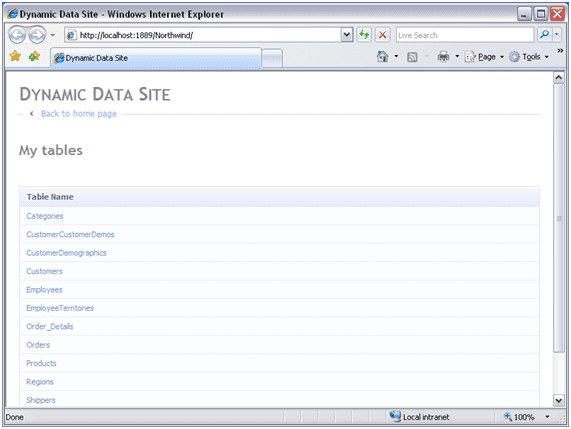
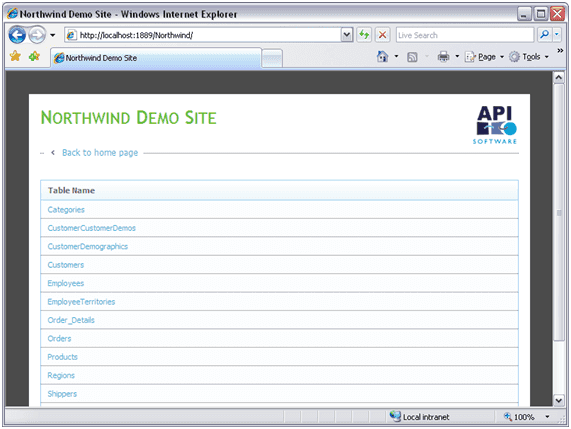
- Press F5 (or Ctrl + F5) to run the application.
- What we have now is a reasonably functional web application.
Customising the website
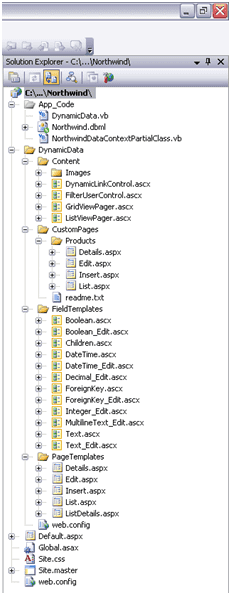
- First up, let's change the style sheet. Note from the structure of the solution below that we don't have an App_Themes folder. Feel free to create one if you like, but for this demo we're just going to overwrite the existing Site.css file.
- Secondly, we'll change the site title in the Site.master file and add a background image to the header (defined in the style sheet).
- Next, let's make some changes to how the data is displayed. You can see in the solution that we have a FieldTemplates folder. Contained in here are user controls for each data type that define how data is displayed and edited in the website. Changes to these controls affect the entire site.
- We'll create two new user controls called RadioBoolean and RadioBoolean_Edit that will display fields for Boolean data types as a RadioButtonList rather than the default CheckBox.
- The contents of RadioBoolean.ascx are as follows: –
<%@ Control Language="VB" AutoEventWireup="false" CodeFile="RadioBoolean.ascx.vb" Inherits="FieldTemplates_RadioBoolean" %>
<asp:RadioButtonList ID="RadioButtonList1" runat="server" Enabled="false" RepeatLayout="Flow" RepeatDirection="Horizontal">
    <asp:ListItem Text="True" Value="true"></asp:ListItem>
    <asp:ListItem Text="False" Value="false"></asp:ListItem>
</asp:RadioButtonList>- And the contents of RadioBoolean.ascx.vb: –
Partial Class FieldTemplates_RadioBoolean

    Inherits System.Web.DynamicData.FieldTemplateUserControl

    Public Overrides ReadOnly Property DataControl() As Control
        Get
            Return RadioButtonList1
        End Get
    End Property

    Protected Overrides Sub OnDataBinding(ByVal e As EventArgs)
        MyBase.OnDataBinding(e)
        Dim val As Object = FieldValue
        If (Not (val) Is Nothing) Then
            If CType(val, Boolean) Then
               RadioButtonList1.SelectedValue = "true"
            Else
               RadioButtonList1.SelectedValue = "false"
            End If
        End If
    End Sub

End Class- The class inherits from FieldTemplateUserControl and overrides the DataControl property, returning the RadioButtonList defined in the mark-up.
- We override the OnDataBinding method, converting the public FieldValue property to a Boolean and selecting the appropriate value in the RadioButtonList.
- The RadioBoolean_Edit.ascx has the same mark-up as RadioBoolean.ascx but sets the Enabled property of the RadioButtonList to true.
- The RadioBoolean_Edit.ascx.vb file is the same as the RadioBoolean.ascx.vb file with the following addition (which add the selected value of the field to a dictionary of fields and their values): –
Protected Overrides Sub ExtractValues(ByVal dictionary As IOrderedDictionary)
    dictionary(Column.Name) = CType(RadioButtonList1.SelectedValue, Boolean)
End Sub- To use this new control we need to add a UIHint to the fields that we want to display a RadioButtonList for. To do this, open up the generated NorthwindDataContextPartialClass.vb file and look for the Discontinued public property of the Product_Metadata class. These _Metadata classes provide a method to further enhance the user interface with custom user controls or additional validators.
- Change the Discontinued property to the following: –
<UIHint("RadioBoolean")>
Public Property Discontinued() As Object
    Get
        Return _Discontinued
    End Get
    Set(ByVal value As Object)
        _Discontinued = Value
    End Set
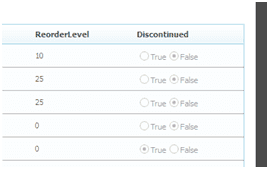
End Property- If you re-run the application, and navigate to the Products table, you should see that the Discontinued field is rendered as a RadioButtonList.
- If we wanted all Boolean fields to be rendered as RadioButtonLists then it would be significantly easier to modify the existing Boolean and Boolean_Edit user controls than assign UIHints to all Boolean properties.
- Let's make a change to the DateTime_Edit control that will affect all DateTime fields across the application by adding a calendar control to it.
- First up, you'll need to install the AJAX Control Toolkit. Once that has installed add the following line to your web.config file in the system.web > pages > controls section.
<add tagPrefix="ajax" namespace="AjaxControlToolkit" assembly="AjaxControlToolkit"/>
<add tagPrefix="ajax" namespace="AjaxControlToolkit" assembly="AjaxControlToolkit"/>
- Next, add the following snippets to the DateTime_Edit.ascx file.
<ajax:CalendarExtender ID="CalendarExtender1" runat="server" CssClass="popupcalendar" TargetControlID="TextBox1" Format="dd/MM/yyyy" OnClientDateSelectionChanged="hideCalendar"></ajax:CalendarExtender>
<script type="text/javascript" language="javascript">
    function hideCalendar(cb)
    {
        cb.hide();
        cb.get_element().blur();
    }
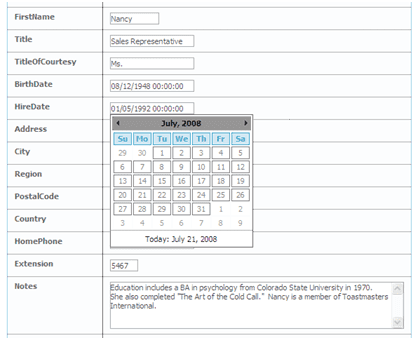
</script>- Re-run the application, navigate to the Employees table, select an Employee to edit and click on a TextBox containing a date to see the calendar.
Further resources
Webcasts
- Developing Data Driven Web Applications Using ASP.NET Dynamic Data – http://sessions.visitmix.com/?selectedSearch=T24
Websites
- ASP.NET Dynamic Data on CodePlex – [http://www.codeplex.com/aspnet/Wiki/View.aspx?title=Dynamic%20Data&referringTitle=Home](https://www.codeplex.com/aspnet/Wiki/View.aspx?title=Dynamic Data&referringTitle=Home)
Blogs
- Scott Guthrie – http://weblogs.asp.net/scottgu/
- Mike Ormond – http://blogs.msdn.com/mikeormond/
